
25. April 2026
How to Upholster a Wingback Chair: A Step-by-Step Guide (with Photos)
Wingback chairs are some of the most rewarding pieces of furniture to bring back to life. The classic shape, the high winged sides, the deep comfortable seat — when one is reupholstered properly, it'll outlast most things in your house. We recently documented the full reupholstery of a traditional wingback frame in a beautiful plaid wool, and this post walks you through every stage of how it's done.
Whether you're considering tackling one yourself, weighing up whether to send yours to a professional, or just curious how the magic happens — this guide will show you the real process, photographed at every step.
Quick answer: what's involved
Reupholstering a wingback chair from a bare frame typically takes 15-25 hours of skilled work and uses around 5-7 metres of fabric. The job involves padding, fitting the inside panels first, then the seat deck and front rail, then closing in the outside panels — usually in that order.
If you're wondering about cost, our wingback and armchair reupholstery starts from £450 in labour (fabric on top — see our full price list and our UK reupholstery cost guide for context).
Now, on to the process.
What you'll need
Before any fabric goes on, you need:
- A wingback frame (either stripped from an old chair or a new pre-assembled frame)
- Foam — typically high-density for seat areas, medium for back and arms
- Dacron polyester wadding — for soft, smooth contours over the foam
- Hessian, webbing, scrim — for any spring or base work needed
- Upholstery fabric — 5-7 metres for a standard wingback
- A staple gun — pneumatic for speed, electric or manual for hobbyists
- Staples in appropriate gauges
- A regulator, wooden mallet, web stretcher, scissors, and tack lifter
- Plastic to protect any exposed wood legs
Most beginners massively underestimate the tool list. If you're missing the right gear, the job takes three times as long and looks half as good.
Stage 1: The bare bones and first steps
This is our starting point: a high-quality, pre-assembled wooden frame. Before any fabric goes on, the process begins with padding.
Leg protection. Notice that the front legs are already wrapped in plastic. This is a small step that saves a lot of grief later — it protects the finished wood stain from scuffs, glue, or stray staples during the upholstery process. Skip it and you'll be sanding and re-staining at the end.
Initial padding. On the inside of the arms, the first layer of padding is being applied. This is typically a shaped piece of foam topped with a layer of white Dacron polyester wadding. The foam gives shape; the Dacron softens the edges and prevents you from feeling the frame underneath. Together they create the gently curved arm shape that defines a good wingback.
First fabric. The very first pieces of plaid fabric have been attached to the top edge of the wings. These small anchor pieces establish the alignment for the rest of the wing panel. Get them straight, and everything else falls into place. Get them wrong, and the pattern will run skewed across the whole chair.
Stage 2: Upholstering the inner arms and wings
Once the initial padding is complete, it's time to apply the main fabric to the insides of the chair. There's a golden rule in upholstery: always insides before outsides. The outside panels are what cover up all your staple lines and raw edges, so they go on last.
Inner panels. The pre-cut fabric panels for the inner arms and inner wings are now stretched into place over the padding.
Tension is everything. This is the highest-skill step in the whole job. The fabric must be pulled with consistent, even tension to ensure it's smooth and free of wrinkles. Too loose and it sags. Too tight and you distort the pattern or tear the fabric. Patterned fabrics like this plaid are particularly unforgiving — every stripe needs to run straight.
Modern technique. We're using a pneumatic staple gun (the blue tool on the workbench), which is much faster and cleaner than the traditional hammer-and-tack method. The fabric is pulled taut and stapled directly to the outside of the arm and wing frame. These staple lines will be hidden by the outer fabric panels in stage 5.
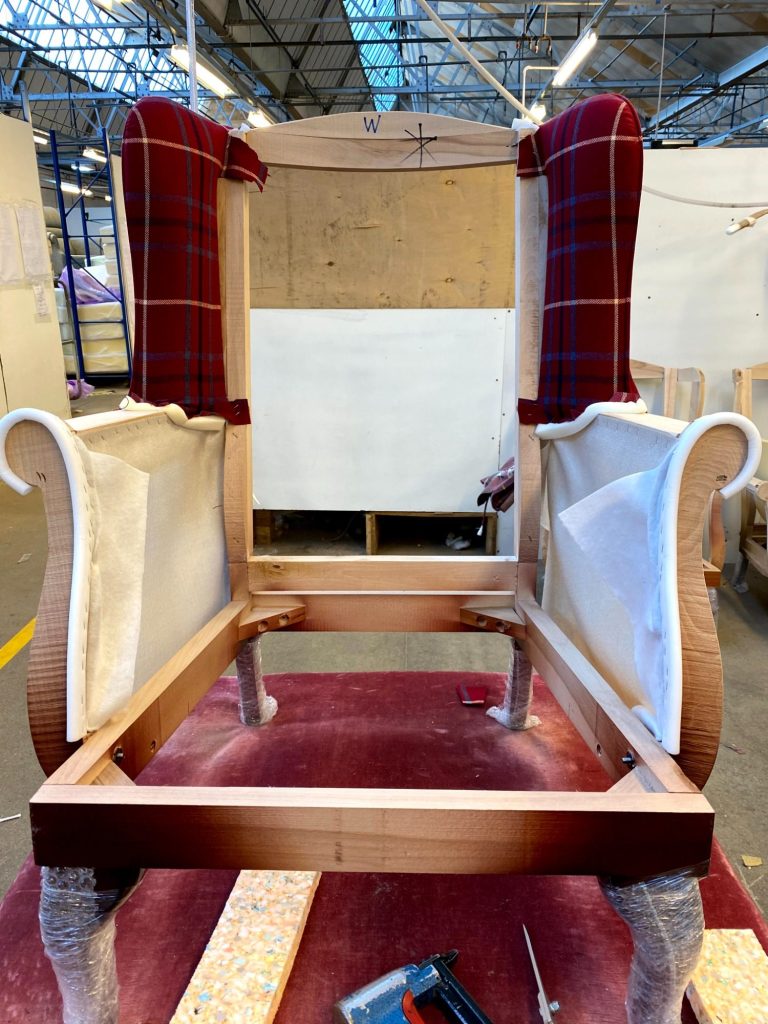
Stage 3: Fitting the inner back
With the arms and wings in place, the inner back is next. This is the largest single panel on the inside and provides the main support for whoever sits in the finished chair.
Back padding. Just like the arms, the back panel is built on a foundation of foam and Dacron. This is where the comfort comes from — get it wrong and the chair will feel hard or hollow no matter how nice the fabric is.
Fabric application. The large, cut-to-shape piece of plaid fabric is then laid over the padding. It's anchored first at the top — you can see the framer's "W" and "X" centre-line markings on the bare wood from earlier, which the upholsterer uses for alignment. Those marks are how a good upholsterer keeps a pattern dead centre.
Stretching. The fabric is then pulled down and outwards, carefully smoothed, and stapled to the frame at the bottom and sides. It's tucked neatly around the arm joints to create a clean, seamless interior. This is one of those quiet moments where decades of practice show — the difference between a good upholsterer and a beginner is mostly in the corners.
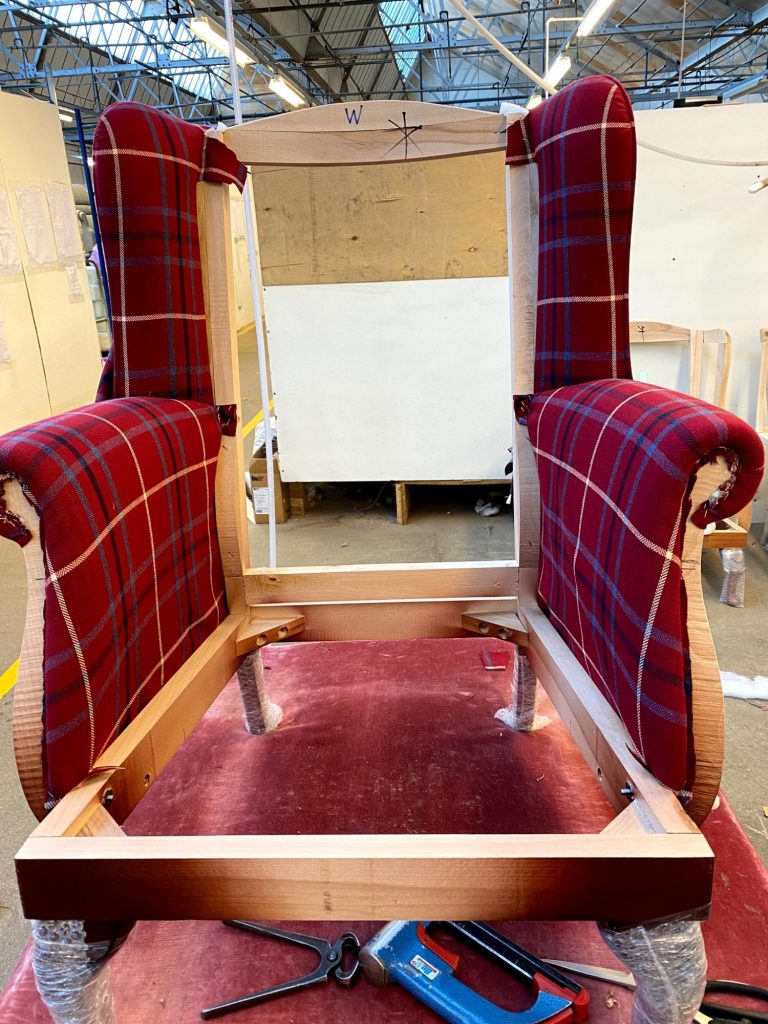
Stage 4: The seat deck and front rail
Now that the entire inside of the chair is upholstered, we move to the base.
Seat deck. The area where the cushion will eventually sit is called the seat deck. Because it'll be hidden under the cushion, a durable, non-decorative fabric is used (here, plain brown). This is stretched over the springs or webbing — already part of the frame in this case — and stapled down. There's no point spending money on expensive fabric where no one will see it.
Front rail. The front-facing piece of wood below the seat deck is now upholstered. This piece, often called the front rail or apron, is padded to give it a soft, rounded profile. The plaid fabric is then meticulously fitted, pattern-matched to the inside back, and secured underneath the chair. Pattern matching across this seam is one of the marks of a properly done job.
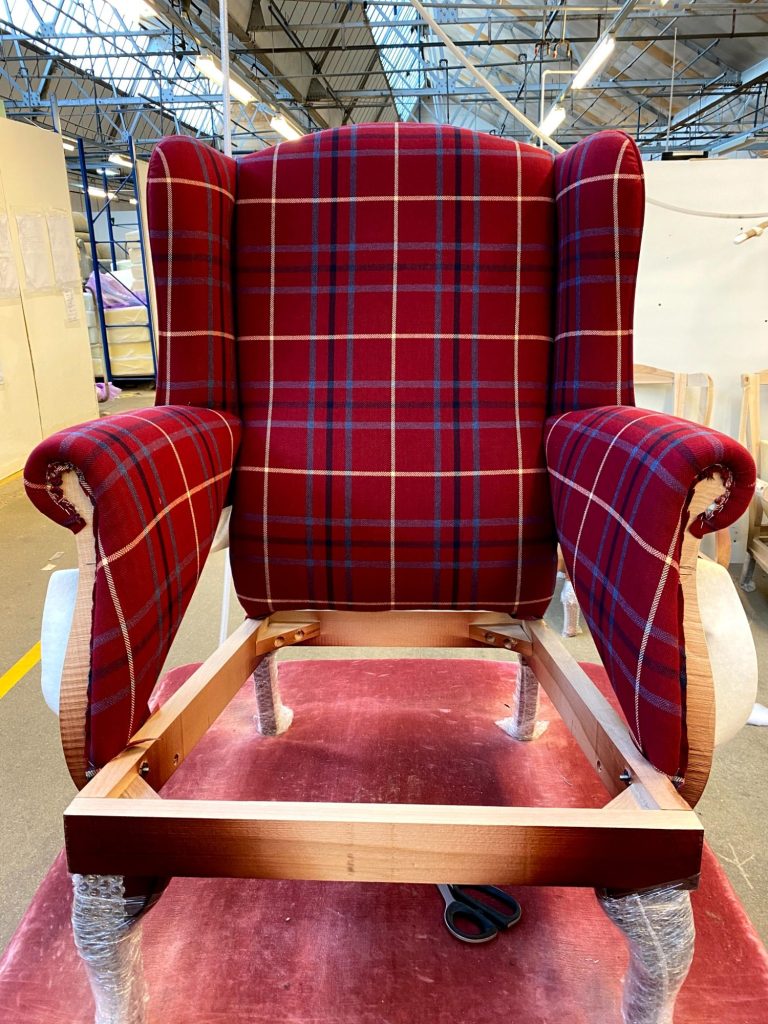
Stage 5: Closing the back
This is one of the final and most satisfying steps. Up until now, the outside of the chair has been a mess of staples and raw fabric edges. The outside panels are applied last to cover everything up.
Final panels. The pre-cut panels for the outside arms and outside back are put in place. These are usually cut slightly oversized so they can be trimmed to a perfect fit.
Creating clean edges. The final back panel is stapled along the top rail. The fabric is then pulled down taut, and the side and bottom edges are carefully folded under to create a perfectly clean, straight line.
Securing. This folded edge is secured using a blind stitch method. In a modern workshop, this is often done with a pneumatic staple gun firing fine-gauge staples into the hard-to-reach edges, or with a curved needle and thread for a truly traditional finish. Either way, the goal is the same: no visible fixings on the outside of the finished chair.
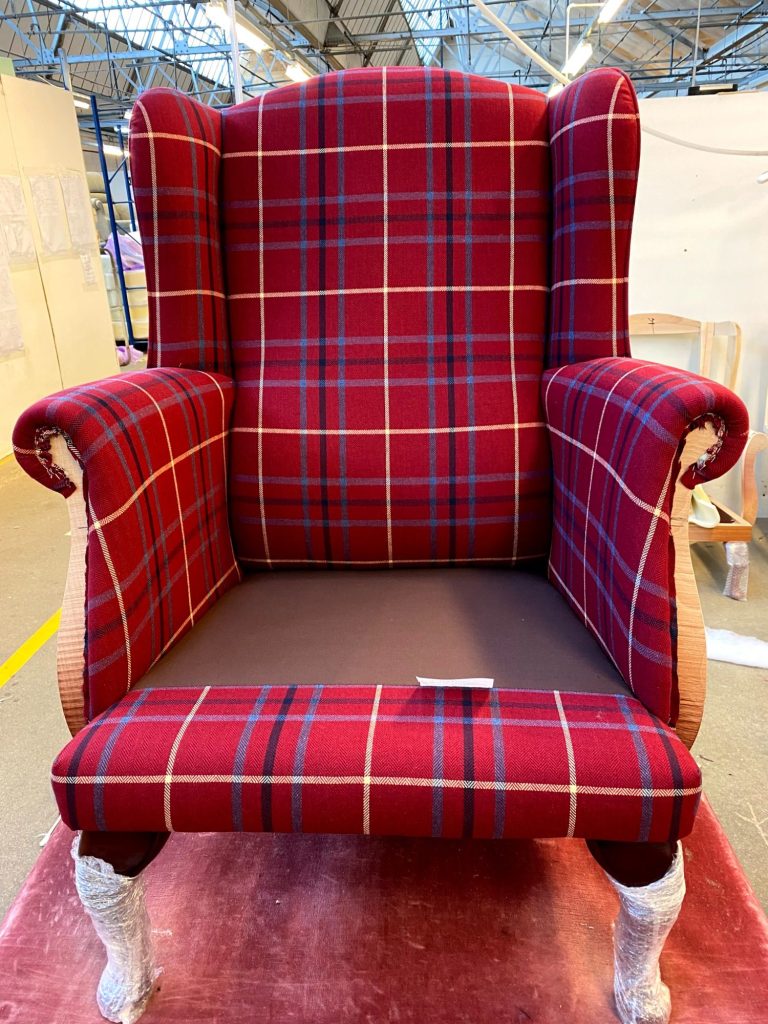
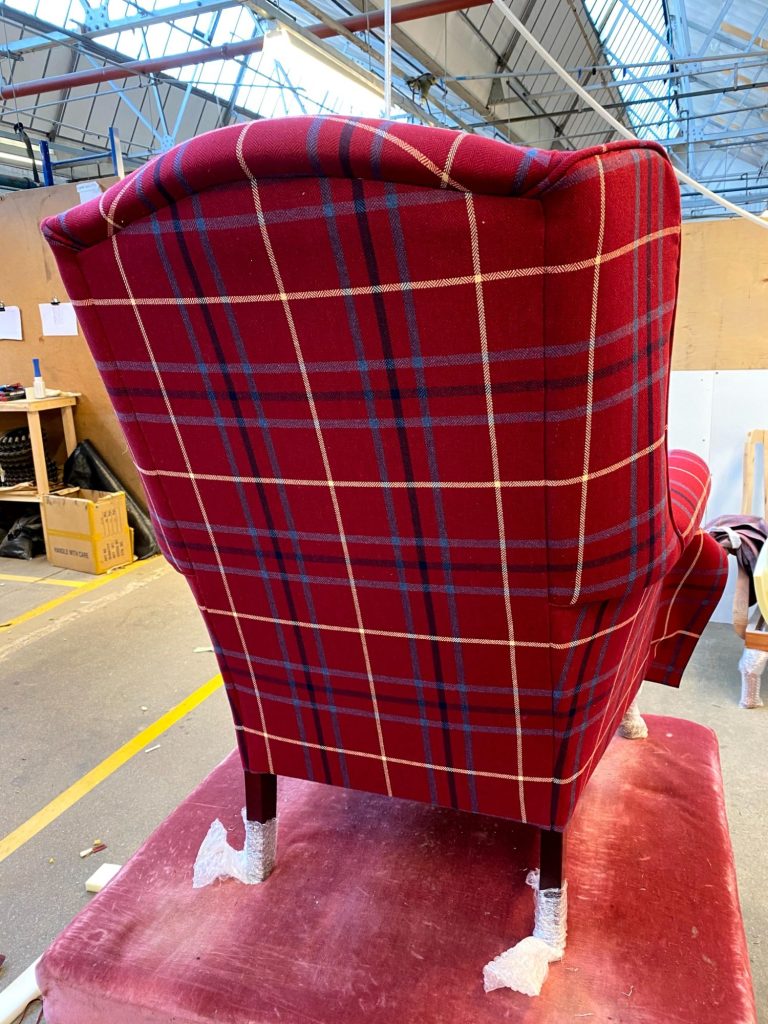
The (almost) finished product

And here it is. The chair is fully upholstered. All the layers of padding and fabric have come together to create the finished piece. The only thing missing is the separate seat cushion, which is built separately and dropped into place.
It's a fantastic example of how modern techniques — staple guns, machine-cut foam, synthetic waddings — can be used to create something that still looks and feels like a piece of traditional craftsmanship. The bones are old, the techniques are mixed old and new, and the result will outlast most furniture made today.
Should you DIY or hire a professional?
This is the honest question worth asking before you spend money on tools and fabric.
DIY makes sense if:
- You enjoy the process and aren't in a rush
- You have somewhere to work (a wingback frame takes up space)
- You're willing to invest in basic tools (£150-£300 for the essentials)
- The chair is a learning project rather than a treasured family piece
- You can tolerate the finished result not being perfect
Hire a professional if:
- The chair is antique, valuable, or sentimental
- You want it to look right and last decades
- You don't have 20+ hours to spare
- You're using expensive fabric and can't afford to ruin it
- You want pattern-matched, properly tensioned, professionally finished work
For most people, the maths come out in favour of hiring — by the time you've bought tools, fabric, foam, and made the inevitable beginner mistakes, you've spent more than a professional quote, and the result rarely matches.
That said, doing it yourself is genuinely satisfying, and there's no better way to understand and appreciate the craft.
Frequently asked questions
How long does it take to upholster a wingback chair?
For a professional, around 15-25 hours of skilled work depending on the frame condition and fabric complexity. For a first-time DIYer, expect to triple that.
How much fabric do I need for a wingback chair?
Roughly 5-7 metres for a standard wingback. Patterned fabric usually needs more because of pattern-matching. If your fabric has a large repeat, add another 1-2 metres.
How much does it cost to reupholster a wingback chair professionally?
At Greenwood Upholstery, our wingback and armchair labour starts from £450, with fabric on top (typically £150-£600 depending on what you choose). For full UK price context, see our sofa reupholstery cost guide.
Can I learn upholstery in a weekend?
You can learn the basics — a footstool or a simple dining chair seat — in a weekend. A wingback chair is a more advanced project that builds on those foundations. We run hands-on weekend workshops if you want to start at the right level.
Is a Parker Knoll wingback worth reupholstering?
Almost always yes. Parker Knoll frames are solid hardwood and built to last decades. A reupholstered Parker Knoll wingback can easily outlive the person sitting in it.
Want us to do it for you?
Greenwood Upholstery is an AMUSF-accredited workshop based in Mytholmroyd, Hebden Bridge. We reupholster wingback chairs, armchairs, sofas, dining chairs and more — using traditional techniques and quality materials, with proper pattern-matching and finishing.
If you've got a tired wingback that deserves a second life, we'd love to take a look.
📩 Email a photo to pat@greenwoodupholstery.com
📞 Call us on 07882 014449
🪡 Or book a course and learn to do it yourself
Free quotes within 24 hours, no obligation.
Greenwood Upholstery · AMUSF accredited · Serving Calderdale, West Yorkshire and beyond. Mobile service available for static caravan upholstery across the North.